Malasana Yoga Garland Pose: Perfect Practice for Inner Thigh Flexibility
Squatting used to be a very easy and conventional pose for our ancestors as it was their daily routine to keep their torso and upper legs hinged at 160-degree angle, they were comfortable doing it. It is our habit nowadays, more likely a routine of how we sit and slouch slowly and lose mobility in our hips and back just to feel comfortable on chairs, beds or cars all day long. If we practice Malasana then it contradicts these common practices and keeps our joints well “oiled” for long-term use. This stance can really enhance your stance, extend your back, elasticize your knees and lower legs, and help enhance your digestive capacity. The Malasana is likewise called the yoga Laurel posture.
Meticulous yoga poses are difficult to practice on one`s own without guidance. For a beginner working the tough muscles in harmony with proper breathing control can be troublesome. Many people struggle with proper alignment, the poses not only come out to be awkward but they can also bring injuries to the back, thighs, wrists and arms. Proper technique is an essential especially for beginners who don`t have professional guidance.
Malasana and Inner Thighs Flexibility
You can live healthy with the yoga garland pose. It is an eye-opener for those who sit for long hours and are immobile due to office work or whatever reason. The specific yoga technique helps against the tightened hips, groin and inner thighs. The pose takes its name origin from Sanskrit Malasana, which suggests that it has ancient Indian roots.
Action plan: Here you will focus on working with the major category of thigh muscles. The ancient Indians traditionally used this pose for long hours of meditation. Garlands are celebrated flowers as they are known to induce feelings of peace.
Caution and Contradiction: If you have had a back or knee injury, you should not practice this pose. If you have to put too much pressure or exertion to achieve the pose consult your doctor before doing it again.
Getting Started
To study this asana in a few simple steps, track the step by step directions given below and get going:
Step 1
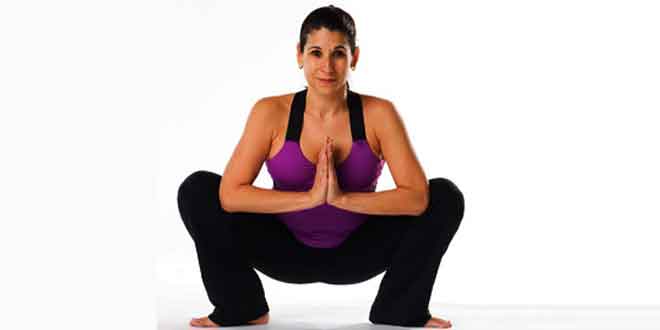
Simple instructions for getting along the Garland pose include standing in Tad asana. A yoga pose which involves extending your hands while keeping them straight on the sides. The feet are parallel to each other six inches apart. Bend knees more like you are about to do a wide squat.
Step 2
Bend your knees and thighs and bring them as close as possible while your body assumes a sitting position. Now bring your elbows inside the knees and press the hands together. Try to bring your hands as close as possible and parallel to the floor.
Step 3
Now put the weight of your body partially on your balanced knees. Try to straighten the spine and shoulders. Push the torso forwards slightly.
Step 4
Hold this position for 20 seconds and release the pressure by placing your hands on the floor and swing back to an upright position. If your knees ache in the pose, place a blanket behind them, between your calves and thighs, to help decrease the amount of flexion.
Reward and Benefits of Yoga Garland Pose:
- Helps tone the belly
- Improves the core muscle strength
- Stretches your ankles, back and neck
- Keeps pelvic and hip joints healthy
- Tones your abdominals
- Builds inner body strength
- Reinforces your metabolism
- Recovers blood transmission in your body
- Malasana helps to reduce stress and increases the circulation
- It helps against the problems of colon and stomach
- The major categories of muscles worked with this pose are thigh
- Malasana is helpful for pregnant ladies